In my opinion, the Sputnik is very capable of taking excellent stereo photos, but it likely requires a few adjustments to coax this performance out of it. Numerous people have posted their own suggested list of “essential upgrades” to the Sputnik (see reference list at the bottom of this page), but since many of the personal webpages are down, I thought I’d provide my two cents. In order of simplest to most challenging, here’s the list that I judge to have the biggest effect on stereo:
- Using good conventional stereo technique: shoot at f/22 or f/16, use a tripod and focus at the hyperfocal distance.
- Fixing Light Leaks
- Reducing Flare: flocking and lens hoods
- Setting focus
1. Using good conventional stereo technique
That’s right — my first suggestion has nothing at all to do with “fixing” the camera. I think using careful technique has the biggest effect on the final image. First, if you are new to stereo photography, I would like to emphasize two important points. A major enjoyable aspect of viewing a stereo images is the freedom to scan one’s eyes around the image and focus on the many interesting small details. If all parts of the image are not incredibly sharp, this becomes less enjoyable. Secondly, capturing the depth in a scene is obviously also quite important. If you accept that most good stereo images are sharp from front to back and contain an appropriate amount of depth, then this has several important consequences for how you will shoot a stereo image compared to “regular” 2D photography. The major insight to appreciate is that in order to take a sharp image with appreciable depth, you need a large depth of field which implies shooting at a small aperture. I would strongly suggest shooting at f/22 or f/16. Currently available slide films a largely limited to ISO 100, which means that under bright sunny conditions, you will be shooting at 1/60th of a second at f/22. This is certainly possible to hand hold without recording excessive motion blur, and many great Sputnik shots have been shot handheld, however if you are in doubt about your hand holding abilities, it is a good idea to shoot with a tripod. The Sputnik has a very old (triplet) lens design, however when used at f/22 or f/16, the performance of the lens in the center of the image is really quite acceptable.
Now that you’ve committed yourself to shooting at f/22 (or f/16), you need to focus the camera. If shooting outdoors, most of the time you will have “optical infinity” present in your field of view, for example, a cloud or a distant building. To keep those distant objects sharp, you will want to set the lenses to their hyperfocal distance. If this concept is familiar to you, you can do your own calculations based on the circle of confusion that you expect to be visible in your viewer, but if you just want a reasonable place to start, try the following:
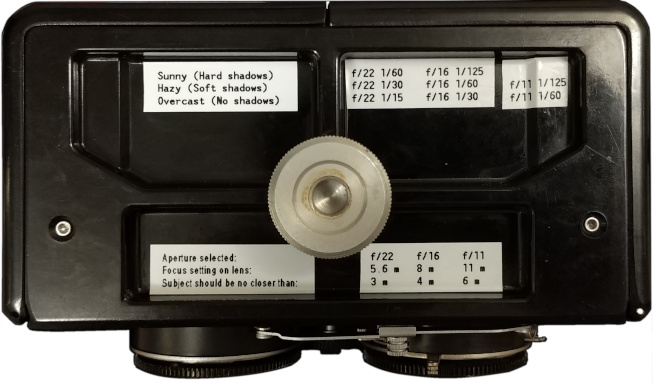
| Aperture selected: | f/22 | f/16 | f/11 |
| Focus setting on lens: | 5.6 m | 8 m | 11 m |
| Subject should be no closer than about: | 3 m | 4 m | 6 m |
Furthermore, when shooting slide film, it is really quite important to get the exposure set correctly. Details of determining proper exposure settings is outside the scope of this article, but some options include: a light meter or phone app, the “sunny 16 rule”, or using a digital camera to test exposure settings.
Attaching a small chart with focus and exposure settings directly to your camera (e.g. with a label maker or sticky tape) can be helpful:
2. Fixing Light Leaks
It is very possible that a Sputnik camera has light leaks. The most common location is around the door. Light seal foam may be purchased for this purpose, but black yarn may also work quite well.
3. Reducing Flare
The shiny bakelite surfaces of the film chambers can cause stray light to reach the film plane. One common solution that works well in my experience is to cover the film chambers with black flocking paper. I offer precut flocking paper for the Sputnik, but you can also cut your own using this SVG template which works well if you have an electronic paper cutter. Alternatively, you can print out the template, tape the printed paper onto the flocking paper and cut out the pieces with a pair of scissors.
The Sputnik has singly-coated lenses, but coatings have improved immensely since the time the Sputnik was made. I recommend using lens hoods to reduce air-glass reflections and refraining from shooting directly into the sun. The bright point light sources encountered in urban nighttime photography are quite likely to cause objectionable flare and night photography is probably best avoided with the Sputnik. I have designed a pair of 3D-printed lens hoods which are available for purchase at my web store or you can print your own using the files hosted at printables or thingiverse.
4. Setting focus
To check the focus, you will need a tape measure, a lamp, and a ground glass. If you need to adjust the focus, you will also need a micro slotted screwdriver (~1 mm tip width). Set the camera up on a tripod or table and place the lamp 1.4 m away from the camera’s film plane. Set the shutter to “bulb” and hold it open with a cable release. Set the focus on the camera to 1.4 m. Open the back of the camera and use some rubber bands to secure a piece of ground glass to the film plane. You can find instructions online on how to make your own ground glass, or you might try asking on the MF3D group list if someone could lend or give you one. If the image of the lamp on the ground glass is not critically sharp when the lens is focused on 1.4 m, you can proceed to adjust it.
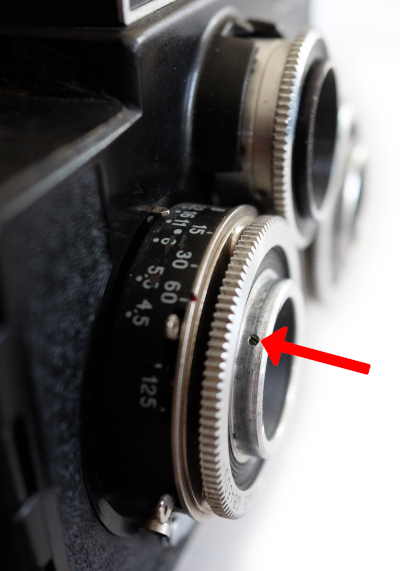
Use the screwdriver to loosen the three set screws that fasten the focus gears onto the front element housing (pictured above). The screws do not need to be completely removed; it is sufficient to back them off about 3 turns. I suggest loosening the three screws equally by a small amount and testing if the focus gear can be removed. If you lose any screws and need to replace them, they are M1.4 x 0.3 mm pitch, 2 mm long, cone-tipped set screws with a slot head. Remove the focusing gears by sliding them off once the screws have been backed off. While looking at the ground glass, rotate the front helical of each lens in turn so that a sharp image appears. Ensure that the focus scale on the viewing lens reads 1.4 m if you plan to scale focus, or alternatively, you may independently focus the viewing lens at this time by looking through the waist level finder. Reinstall the gear rings to the nearest meshing tooth position and fasten the set screws evenly.
Not Recommended
Unless you are experienced with camera repair, I would strongly advise against unmounting any lens element from its metal housing. The rear and middle elements are retained within their housing with a simple wire circlip. I personally find these to be somewhat challenging to remove and extremely difficult to install without damaging the lens surface or marring the lens housing. If you do attempt this, I suggest first covering the lens with Scotch magic tape (green box) to protect it. The main reasons to remove the lens elements would be to blacken the edges of the middle element or to service the aperture or shutter blades, which is a task not readily accomplished by a repair novice such as myself.
Some time ago, I was tasked with repairing a Sputnik for a friend which had a rear element that fell out. I am not sure if the issue was the diameter of the lens element, the housing or the circlip, but I wasn’t keen on reinstalling the circlip. I did some shopping around and found that a 17 mm ID inverted internal retaining ring (such as 90441A205 from McMaster-Carr) fits quite well and is so much easier to install with a pair of snap ring pliers. It does restrict the clear diameter of the rear element, but it didn’t restrict the exit pupil at photographically useful apertures. I would definitely do this again if I needed to reinstall a rear element. Unfortunately, there is no such off the shelf option that would work for the middle element as the circlip rests in a narrow channel formed between the housing and the beveled surface of the lens.
References
Quite a few other people have posted their recommended Sputnik modifications; here are some links in alphabetical order which may be helpful:
General tune-ups and modifications:
Aaron Muderick
Greg Erker
Jeff Pierce
Marco Pauck
Rocky Mountain Memories
Sam Smith
Tom Deering
Shutter disassembly:
John Bercovitz at Rocky Mountain Memories
Marco Pauck